
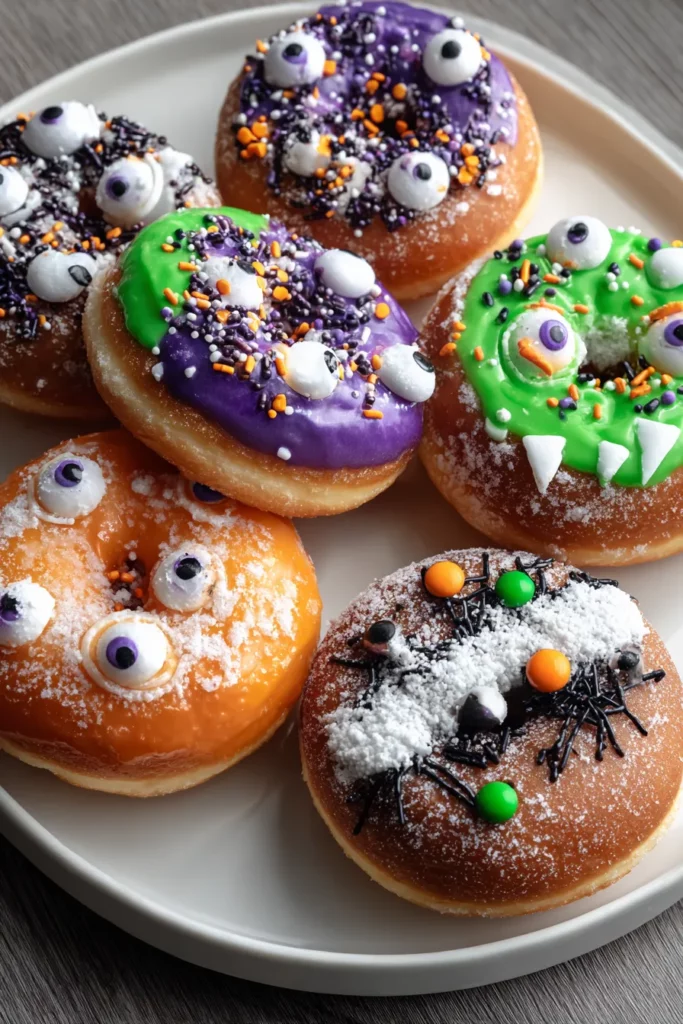
When Halloween arrives, there’s something wonderfully magical about transforming a simple bite into a whimsical, spooky delight. Halloween Monster Donuts take the humble donut and give it a colorful, playful twist that’s guaranteed to bring out the kid in everyone. Soft, pillowy dough is fried to a light golden brown, then dusted with a whisper of powdered sugar before being dressed up in vibrant shades of green, purple, and orange. Each donut becomes a mini canvas for your imagination—perfectly round bases that pop with creepy-crawly candies, squinty candy eyes, and mischievous licorice grins. Whether you’re hosting a haunted house party or baking with little monsters in the kitchen, these donuts will fill your home with giggles, laughter, and a touch of sweet suspense.
Beyond the fun factor, these donuts are surprisingly simple to make, even if you’re a total beginner. With just pantry staples and a few drops of food coloring, you can whip up a batch in under an hour. The dough comes together quickly in two bowls, and while the oil heats, you’ve got time to unleash your inner artist on sprinkles and candy decorations. Kids will love choosing their favorite colors, and adults will appreciate how the light, fluffy texture melts against your tongue. So put on your apron, grab your favorite spooky playlist, and let’s embark on a monster donut adventure that will have everyone asking for just one more!
Before we jump into the mixing bowls, it’s helpful to know exactly what makes these monster donuts so delightfully spooky—and delicious. Here’s a breakdown of each key component and why it’s essential for turning ordinary donut batter into a vibrant, party-ready treat.
Provides the structure and body for the donuts. Its balanced gluten content ensures a tender, fluffy crumb without getting too dense.
Sweetens the dough and helps to achieve a light, golden-brown crust when fried. It also aids in creating that slight caramelized flavor.
Adds moisture and richness to the batter, producing a soft interior. Whole milk or 2% works best for a creamy texture.
The leavening agent that makes the donut rise and become airy. It creates tiny bubbles in the dough, giving a springy bite.
Enhances the sweetness and balances the flavor profile. Just a small pinch goes a long way in highlighting all the other ingredients.
Melted into the wet ingredients for a rich, buttery undertone. It keeps the donuts tender and adds a subtle depth of flavor.
Infuses the batter with warm, aromatic notes. This little touch makes every bite taste homemade and comforting.
Bind the ingredients together and contribute to the structure. They also help create a golden color and add moisture.
The star of the show for that freakishly fun look. These hues transform each donut into a different monster character.
Provide texture, color, and personality. From mini gummy worms to sugar pearls, they let you design endless monster faces.
Offer focal points for those googly monster eyes. Simply press them into the donut tops for instant creep factor.
A light dusting adds a ghostly finish and a hint of extra sweetness. It also helps any decorations adhere better.
The frying medium that produces a crisp outer shell and tender inside. Choose a neutral oil to let the donut flavors shine.
Ready to bring these monstrosities to life? Follow these steps carefully for perfect, spooky donuts every time. Pay attention to temperatures, timing, and techniques to achieve that irresistible texture and color.
1. In a large bowl, whisk together the flour, sugar, baking powder, and salt until the mixture is uniform and free of lumps. This ensures even rising and a smooth dough.
2. In another bowl, combine the milk, melted butter, vanilla extract, and eggs. Whisk until well blended, making sure the eggs are fully incorporated and the batter looks silky.
3. Gradually add the wet mixture to the dry ingredients, stirring gently with a spatula or wooden spoon. Mix just until combined—overmixing will lead to tough donuts.
4. Divide the batter into three separate bowls. Add a few drops of green food coloring to one, purple to the second, and orange to the third. Mix each bowl until the colors reach your desired intensity.
5. Heat vegetable oil in a deep fryer or heavy-bottomed pot to 350°F (175°C). Use a thermometer to maintain a consistent temperature for even frying.
6. Carefully spoon dollops of colored batter into the hot oil. Fry until a golden crust forms on one side, about 2–3 minutes, then flip and cook the other side for an additional 2–3 minutes. Avoid overcrowding the fryer to keep the oil temperature stable.
7. Use a slotted spoon to transfer the donuts onto paper towels. Drain well to remove excess oil, then let them cool slightly before decorating.
8. Once the donuts have cooled but are still slightly warm, decorate with powdered sugar, assorted candies, sprinkles, and candy eyes or chocolate chips. Press decorations gently into the donut surface to make fun monster faces.
9. Serve immediately and delight in your spooky creations!
When these colorful creatures come alive, serving them is almost as fun as making them. Whether it’s a ghoulish gathering or a cozy family movie night, presentation can turn your donuts into the star attraction. Set them on a tiered stand, surround them with flickering LED candles, or place them on a platter lined with faux spider webs. A sprinkle of edible glitter or a dusting of powdered sugar “spider silk” can elevate the spooky factor even more. Consider pairing the donuts with warming drinks—like pumpkin spice lattes or hot chocolate—to complement the rich, fried dough and sweet decorations. Finally, don’t forget themed napkins and plates to tie everything together; small details can make a big impact at your celebration!
After the haunting fun winds down, you might have a few leftover monsters stalking your countertop. Proper storage will keep them as fresh and delightful as the moment they were made. Because these donuts are best enjoyed fresh, try to serve them within the first few hours—but if you need to stash them away, airtight containers are your best friend. Keep decorations intact by gently placing the donuts in a single layer, and consider slipping parchment paper between layers to prevent sticking. For longer preservation, freezing can be an option, though some decorations may shift slightly upon thawing. Below are a few tried-and-true methods for maintaining texture and flavor, so your spooky snacks stay as delightful as on day one.
Making Halloween Monster Donuts is more than just following a recipe—it’s about embracing creativity, having fun in the kitchen, and sharing sweet memories with friends and family. From mixing the batter to choosing the perfect shades of green, purple, and orange, every step is an opportunity to unleash your inner artist. These donuts bring a playful twist to any Halloween gathering, turning snack time into a hands-on, interactive adventure. Even if you’re a beginner baker, you’ll find this recipe straightforward and rewarding. The simple ingredients transform into eye-catching treats that taste as good as they look, with a light, fluffy interior and just the right amount of crispiness on the outside.
Feel free to print this article and save it for your next spooky baking session, or jot down a few notes in your recipe journal. You can also find a FAQ section below to help answer any lingering questions you might have about ingredient swaps, baking variations, or troubleshooting. If you give these donuts a try, I’d love to hear how it went—whether you nailed the perfect monster grin or came up with your own eerie twist. Leave a comment, share your feedback, or ask any questions you have. Happy haunting—and even happier snacking!
These vibrant, monster-themed donuts are not only deliciously fluffy but also loaded with creative toppings. Great for parties or a festive treat!

Hi! I’m Max Turner, the recipe hacker, flavor hunter, and home-cook behind RecipesAsSeen.com. Like most guys, I’ve lost count of how many times I’ve seen a mouthwatering recipe on TV, TikTok, or YouTube and thought, “Is that even legit?” That curiosity (and hunger) turned into this blog.