

The first time I tasted these No Bake Pumpkin Cheesecake Bars, I swear I felt like autumn had wrapped me in a cozy blanket. Creamy, spiced, and just sweet enough, they capture everything we love about pumpkin desserts—without ever heating up the kitchen. As the days grow shorter and the temperatures dip, this recipe becomes my go-to for easy entertaining. You’ll love how the crisp graham cracker crust provides a delightful crunch beneath that luscious pumpkin cheesecake filling. And the best part? No oven time, which means you can whip this up even on the busiest weekdays or when you’re craving something indulgent in an instant.
Beyond their incredible taste, these bars are wonderfully forgiving. Even if you’re new to cheesecake territory, the steps are straightforward and beginner-friendly. From whipping the cream cheese and folding in the spiced pumpkin puree, to letting everything chill until it firms up perfectly—each moment feels rewarding. I remember the first time I made these for a small gathering, and watching my friends’ eyes light up as they took that first bite still makes me smile. So whether you’re hosting a fall brunch, packing dessert for a potluck, or simply treating yourself, these creamy, dreamy bars have you covered. Let’s dive into how to assemble this autumnal masterpiece!
KEY INGREDIENTS IN NO BAKE PUMPKIN CHEESECAKE BARS
To make these bars shine, we rely on a handful of star ingredients that work together in perfect harmony. Each one brings a unique texture or flavor note, from the crunchy base to the silky pumpkin-infused topping. Understanding their roles will help you feel confident as you prepare this no-bake dessert.
- Graham cracker crumbs
Serve as the foundation, creating a buttery, crunchy crust that contrasts beautifully with the creamy filling. Their subtle sweetness and toasty flavor are classic for cheesecake bars.
- Unsalted butter (melted)
Binds the cracker crumbs together and adds rich, mellow flavor. Melting it first ensures an even coating and a sturdy crust once chilled.
- Cream cheese (softened)
The heart of the cheesecake layer, providing that signature tangy creaminess. Room-temperature cream cheese whips up smoothly for a velvety texture.
- Powdered sugar
Sweetens the filling without any graininess. Its fine texture helps create a smooth, silky cheesecake base.
- Canned pumpkin puree
Brings autumn’s signature flavor, along with natural moisture and color. Blends perfectly for a rich, velvety filling spiced just right.
- Vanilla extract
Enhances sweetness and rounds out the pumpkin’s earthy tones. Pure vanilla deepens the overall flavor profile.
- Ground cinnamon
Infuses a warm, comforting spice note that defines pumpkin desserts. Cinnamon pairs beautifully with the pumpkin puree.
- Ground nutmeg
Adds a woody, slightly nutty aroma that complements the cinnamon and pumpkin. A little goes a long way toward warming the filling.
- Ground ginger
Offers a bright, zesty kick. This small amount ensures your cheesecake bars have a nuanced spiciness.
- Salt
Balances the sweetness and enhances all the flavors. Even in desserts, a pinch of salt is essential.
- Heavy cream
When whipped to stiff peaks, it lightens the filling and adds extra richness. Folding it in creates a fluffy, airy texture.
HOW TO MAKE NO BAKE PUMPKIN CHEESECAKE BARS
Before diving into each step, it’s helpful to know that this recipe is all about simple techniques: mixing, pressing, whipping, folding, and chilling. No fancy equipment or baking skills needed—just basic kitchen tools and a bit of patience while the bars set in the fridge. Let’s walk through it:
1. In a medium-sized bowl, combine the graham cracker crumbs and melted butter. Mix thoroughly until the crumbs are well-coated, ensuring every bit sticks together for a firm crust.
2. Press the crumb mixture firmly into the bottom of a 9×13-inch pan, creating an even layer. Use the back of a measuring cup or a spatula to smooth and compact the crust. Then, refrigerate the pan while you move on to the filling.
3. In a large mixing bowl, beat the softened cream cheese on medium speed until smooth and creamy, scraping down the sides as needed to avoid lumps.
4. Add the powdered sugar to the whipped cream cheese and continue to beat until fully incorporated and silky.
5. Add in the canned pumpkin puree, vanilla extract, ground cinnamon, nutmeg, ginger, and salt. Beat on low, then medium speed until the mixture is thoroughly combined and silky-smooth.
6. In a separate, chilled bowl, whip the heavy cream until stiff peaks form. This typically takes a few minutes with an electric mixer on high.
7. Using a spatula, gently fold the whipped cream into the pumpkin cheese mixture. Take your time to keep as much air in the whipped cream as possible for a light texture.
8. Spread the pumpkin cheesecake mixture evenly over the chilled graham cracker crust, smoothing the top with an offset spatula for a clean finish.
9. Cover the pan with plastic wrap and refrigerate for at least 4 hours, or until the filling is fully set and firm to the touch.
10. Once set, use a sharp knife to slice into bars. Wipe the blade between cuts for clean edges, and serve chilled.
SERVING SUGGESTIONS FOR NO BAKE PUMPKIN CHEESECAKE BARS
After patiently letting your bars set, it’s time to elevate their presentation and taste experience. Serving these pumpkin cheesecake bars is a chance to get creative—whether you’re aiming for classic coziness or a show-stopping dessert display. Here are four fun ideas to customize your plating and delight your guests:
- Garnish with a swirl of whipped cream and a dusting of ground cinnamon. Pipe the cream around each bar’s edge using a star tip for an elegant, café-inspired look.
- Drizzle warm caramel sauce over the sliced bars just before serving. The hot caramel creates a beautiful contrast with the chilled cheesecake, and the sticky sweetness pairs perfectly with pumpkin spice.
- Sprinkle toasted pecans or chopped walnuts on top for added crunch and nuttiness. You can toss the nuts in a little melted butter and brown sugar, then roast until golden for extra flavor.
- Add a sprig of fresh mint or a few dried cranberries for a pop of color and brightness. The mint adds freshness, while the cranberries give a sweet-tart touch that complements the creamy filling.
HOW TO STORE NO BAKE PUMPKIN CHEESECAKE BARS
Keeping your pumpkin cheesecake bars fresh and flavorful is easy with the right storage methods. Whether you’re planning ahead for a gathering or want to savor leftovers throughout the week, these tips will help maintain the perfect texture and taste.
- Refrigerate in an airtight container. Once cooled and sliced, place the bars in a single layer or separated by parchment paper to prevent sticking. They’ll stay fresh for up to 5 days.
- Wrap the whole pan or individual bars tightly in plastic wrap. This barrier keeps out moisture and fridge odors. For extra protection, layer with aluminum foil over the wrap.
- Freeze for long-term storage. Place slices on a parchment-lined baking sheet and freeze until solid. Transfer to a freezer-safe bag and label with the date. They’ll keep well for up to 2 months—just thaw in the refrigerator overnight before serving.
- Store toppings separately. If you’ve added whipped cream or caramel, keep these in small containers alongside the bars. Add them just before serving to maintain the best texture.
CONCLUSION
What a delightful journey through the world of creamy, spiced, no-bake goodness! From the moment you press that buttery graham crust into the pan, to the gratifying chill time while flavors meld, these Pumpkin Cheesecake Bars effortlessly capture the essence of fall in every bite. You’ve learned how simple it is to mix, whip, and fold your way to a luscious filling, all without firing up the oven. Whether you’re a cheesecake novice or a seasoned pro, this recipe offers a satisfying blend of textures—the crunchy base, the silky pumpkin layer, and the light, airy cream—making each forkful an absolute treat. And with handy tips for serving and storing, you can impress guests or indulge yourself with ease and style.
Feel free to print this article and tuck it into your fall recipe collection, or save it on your device for the next time the craving strikes. Below, you’ll also find a helpful FAQ section to troubleshoot any questions that pop up. If you give these bars a try, I’d love to hear how they turn out—drop a comment, ask a question, or share your little tweaks! Your feedback and stories bring this recipe to life, and I’m always here to help if you need advice on substitutions, presentation ideas, or troubleshooting. Happy no-bake baking, and here’s to many more cozy, flavorful dessert adventures!
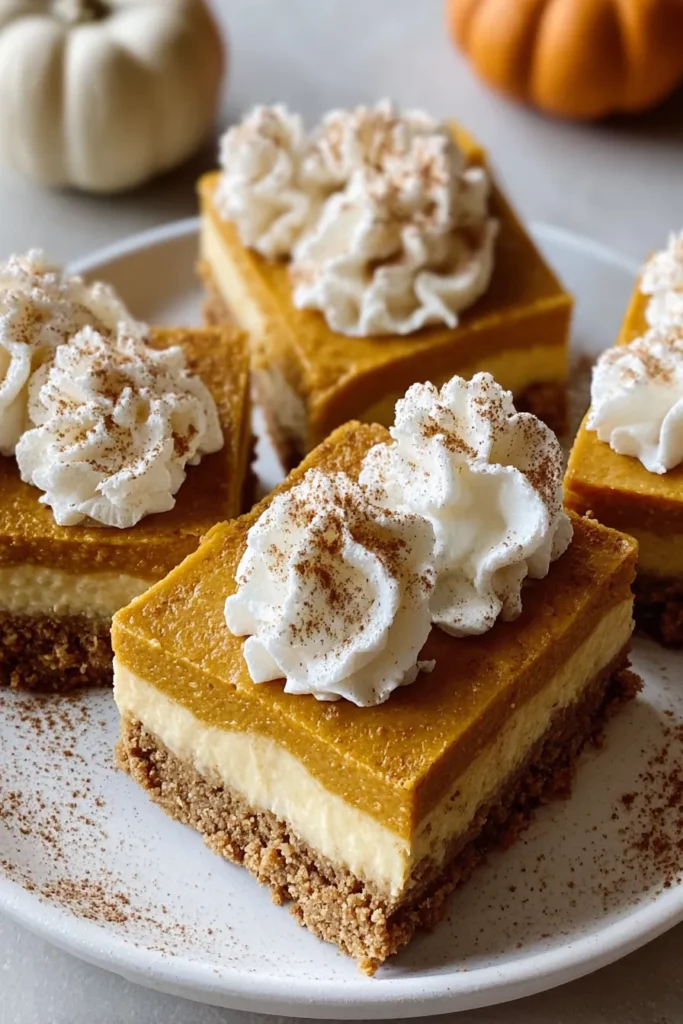

No Bake Pumpkin Cheesecake Bars
Description
These No Bake Pumpkin Cheesecake Bars boast a luscious pumpkin filling spiced just right, all sitting atop a crisp graham cracker crust. Perfectly creamy and effortlessly indulgent!
Ingredients
Instructions
-
In a medium-sized bowl, combine the graham cracker crumbs and melted butter. Mix until the crumbs are well-coated with butter.
-
Press the crumb mixture firmly into the bottom of a 9x13 inch pan to form an even crust. Refrigerate the crust while you prepare the filling.
-
In a large mixing bowl, beat the softened cream cheese until smooth and creamy.
-
Add the powdered sugar and continue to beat until well incorporated.
-
Mix in the canned pumpkin puree, vanilla extract, ground cinnamon, nutmeg, ginger, and salt. Beat until thoroughly combined and smooth.
-
In a separate bowl, whip the heavy cream until stiff peaks form.
-
Gently fold the whipped cream into the pumpkin mixture using a spatula. Be careful not to deflate the whipped cream.
-
Spread the pumpkin cheesecake mixture evenly over the chilled graham cracker crust.
-
Cover the pan with plastic wrap and refrigerate for at least 4 hours or until the cheesecake has set.
-
Once set, slice into bars and serve.
Note
- Ensure cream cheese is at room temperature for a smoother consistency.
- Graham crackers can be substituted with ginger snaps for an added spice kick.
- These bars can be topped with whipped cream or caramel sauce for extra indulgence.
- The bars can be stored in the refrigerator for up to 5 days.